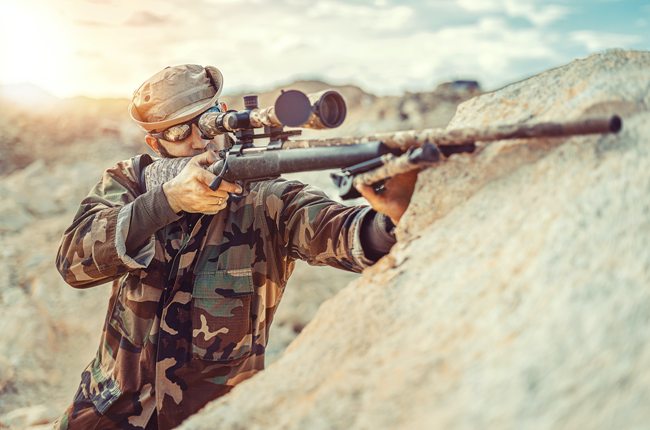
Learning how to shoot a gun has become more and more popular nowadays. More people think that it is a must to learn how to use guns to protect themselves.
One of the essential parts of gun shooting training is control riflescope. In this post, let’s dive deep into the process of adjusting a scope and see how to do it!
Contents
How To Adjusting A Scope
In this topic, we will divide the content into five main parts. The windage, parallax, and elevation are the top three essential skills for gun shooting, while magnification modification and turret control are skill sets to improve the overall performance.
No need to waste more time; let’s start the first section about windage adjustment.
Windage Adjustment
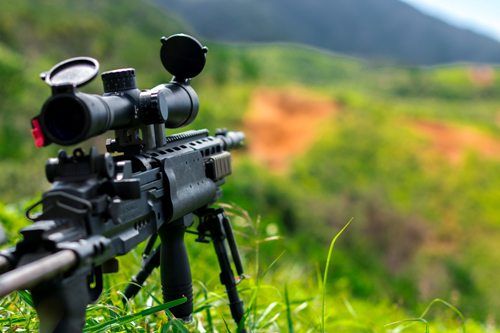
When learning about windage adjustment, it is a must to learn the term “turret.” Briefly, the turret is a knob placed on the scope body to adjust the windage and elevation level. Typically, the knob is designed with a cap, but in some cases, there is no cap or lid to protect the knob.
First, let’s talk about the windage effect. In short, the term “windage” refers to the effect of the wind in deflecting a missile, like a bullet. So, when we mention adjusting the windage, we want to minimize the deflecting consequences so that the percentage of shooting target correctly is higher.
To be specific, the windage effect only influences the movement of a bullet to the left and right. We will discuss the upward and downward mobility of a bullet in the “elevation” section later.
In shooting training, windage adjustment is preferred and taught by instructors carefully because this step is important for targeting an object.
It is complicated to adjust the windage level: on the right side of the scope, find the small knob with the windage symbol. Next, slightly circle the knob. You can see the rifle scope gradually zoom in to the target and focus on it until the image is crisp, sharp, and clear.
Now, turn on the magnification feature, zoom in 4 times bigger, and shoot vertically three times. After finishing three shots, evaluate the distance and how the bullet goes. Is it properly aligned? Is there much difference from your target?
Finally, adjust the windage by clicking on it a few times until the average divergence is not much “off the vertical line.”
The process is quite long, right? Typically, we won’t even use the windage adjustment knob when there is a rush. How could we continuously repeat the long process with many steps, right? In those cases, we will just calculate the difference gap and move the rifle. We think this step is quite effective, though.
Parallax Adjustment
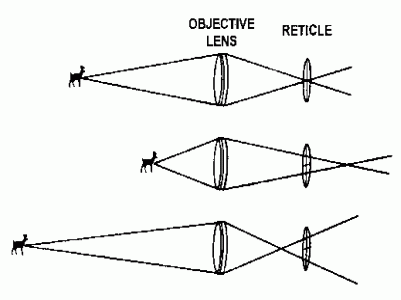
First, let us clarify what parallax is. In short, parallax is the photogenic term to refer to the state whereby the direction or position of an object appears differently when viewed in other positions.
In other words, parallax means the difference of how a thing is viewed in different eye positions.
Given that fact, when mentioning “parallax adjustment,” we will discuss how parallax affects the way one person sees a target, and such an effect influences the performance when shooting.
In parallax adjustment, we want to minimize the difference and bring the target image into the same focal plane as you can see in the reticle.
On most riflescopes, the switch for modifying the parallax is designed near the lens. Meanwhile, it can be found on the side of the scope if you are using a high-end one. To fix the parallax, just rotate the entire outer ring situated at the end of the scope.
For a long time, scope manufacturers don’t think parallax is a significant problem since the difference is low. However, recently, they have added the parallax adjustment so that users can optimize their shooting performance better.
Most people, even experienced shooters, typically make one big mistake: misalign the head. When moving your body to find a perfect shooting posture, they can move the focus and change the “eye” position, right? When seeing the eye is not as correct as before, people may adjust the head and the eye again. Such a case makes the parallax effect.
But the consequences of moving the rifle do not stop there. When adjusting the tool, people accidentally change the orientation of the barrel. The more eye adjustments users make, the more parallax it is. Therefore, having a proper parallax adjustment is a must before shooting, right?
To add-in, we want to advise you to search for the keyword “adjustable parallax” instead of “adjustable objective.” The latter word may mislead you to purchase the wrong products since the “adjustable objective” scope may not have the parallax adjustment feature.
Elevation Adjustment
As mentioned above, elevation adjustment is the process of modifying the impact of the bullet upward or downward, compared to the aiming position. We will fix the elevation by clicking or pressing the knob situated on the top of the scope.
Just like the windage effect, the elevation problem can influence your shooting performance remarkably. For example, if you don’t fix the elevation right, the bullet can fly 2 or 3 feet higher than your target point. This is such a serious scenario because other innocent people can get injured by such deflection, right?
Therefore, let us introduce you to how to adjust the elevation. First, get a white (must be white) paper sheet, draw a horizontal line in the middle, then put the paper on the target plate.

Next, make sure to zero the scope. By that we mean, align the point of aim exactly as the point of impact. Then, fire three shots in a row on the horizontal line and find the average divergence, just like adjusting windage.
Based on the gap between the real position of the bullet after shooting and the target point, modify the elevation. Keep on shooting three shots, check the divergence, and fix the elevation until the difference is as low as possible or no difference at all.
There is a common problem that most beginners experience: the reticle goes opposite to the target side. Most will panic in that case. Therefore, we want to acknowledge that the reticle must go to the opposite side so that you have to move the rifle until it reaches the target place. That’s the concept of elevation adjustment.
Magnification Modification
Besides windage, parallax, and elevation, magnification is another component you need to adjust when using a scope. To be specific, the magnification can be easily modified by rotating the ring placed forward the ocular housing.
When changing the magnification, you can see the image larger or smaller immediately. Just look at the reticle and compare; you’ll see.
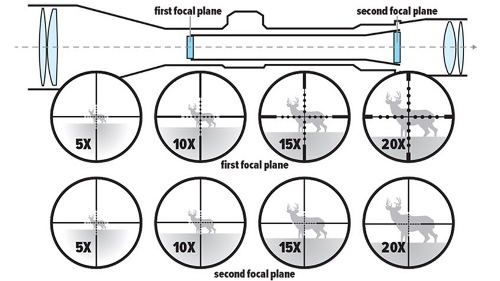
Additionally, there are two types of scopes: the first focal plane and the second focal plane.
Regarding the first focal plane (FPP), the scope will modify the reticle with the target image. Thus, you can use any markings on the reticle to measure the magnification setting.
In contrast, the riflescope with a second focal plane (SFP) will adjust only the target image, while the reticle remains the same size.
In general, using magnification is good, but you should not overuse it. The sharper and bigger the target is, the harder it is to see and shoot.
Turret Control
In the previous sections, we have mentioned “turret” many times. However, we haven’t introduced it fully to you, so here you are.
In short, “turret” is a small, circular structure with many tiny saw-edges. You can see the turret as a knob for windage and elevation adjustment.
What makes the turret system distinctive from others is that the turret is better for slight and detailed modification. For instance, if the scope you use has the 0.1 feet unit, and you want to increase the elevation to 2.4 feet, just click the turret four times. How could this detailed modification be available in other adjustment systems right?
Originally, the turret is targeted to zero the rifle’s scope. The process of adjusting the scope back to zero requires moving the reticle up, down, right, left until it completely aligns with the point of aim. And, only the turret system with its detailed features can fulfill this requirement.
Recently, there are some common types of turrets, such as:
- Target turrets (competition and longe-range practice)
- Ballistic turrets (larger adjustments per click, shoot quickly with not-so-detailed adjustments)
- Fingertip turrets (tiny turret that you can control with one finger)
- Capped turrets
How To Focus The Eyepiece?
In fact, eyepiece focus is not considered as a part of adjusting scope typically. However, we still recommend you to do that since an incorrectly focused eyepiece makes your quality of the shot worse.
Besides, most training courses did not guide how to choose the eyepiece properly and exactly, so we think it is a must to discuss it now.
Just imagine, when you try to shoot a thing, but it seems so blurry, how could you ensure that the bullet went the right way? In some cases, you can even focus on the wrong person and injure them, right?
So, let us guide you on how to adjust the scope for better eyepiece focus.
First, please ensure that the riflescope is properly placed and aligned in the position you demand. Then, adjust the scope until it stares at (literally) any solid object with a light color close to you.
What’s next? Situate the scope to ensure that it won’t be adjusted when you move your body around.
In the next step, please ask anybody (but it would be better to have a friend to help) to hold a white paper sheet or any white towel (if a paper is not available) one or three feet in front of the scope.
Your job now is to focus on the paper and adjust the scope. However, before that, close your eyes and rest for 10 seconds because the next step will demand your eyes to “overwork.”
After 10 seconds, open your eyes and focus on the reticle. Close the reticle immediately in 2 seconds. The reason for such a hurry is because the longer you keep the “eye,” the harder it can focus. Consequently, the scope may not be able to take the correct eyepiece focus.
Repeat the opening-then-close-after-2-seconds procedure until you see the reticle is sharp and clear enough. How to know that it is properly sharp and focused then? Use your eyes to look into the scope in about 2 or 4 seconds to check.
You can also adjust the windage, parallax, or elevation to ensure the eyepiece is properly focused during the process. However, just modifying them after setting up the magnification range already.
How To Adjust The Brightness On Reticles
As mentioned above, the reticle is also influential to the eyepiece focus. With the properly bright reticle, the riflescope can have a correct focus point, helping users shoot more effectively.
You can adjust the illuminated reticles on most scopes by using a small switch on the left side. Please refer to the manual guide of each scope to see how to modify the reticle since each product may have different rules.
Additionally, we want to remind you one more thing about reticles: always checking the reticle after shooting. This component is quite fragile and easy to get scratched, so you must turn it off and maintain it properly after conducting the work.
To add in, we advise you to turn the brightness of the illuminated reticles down as much as possible. Typically, if you turn the brightness too high, it may counteract and spark, making it difficult to target the object to shoot.
Final Thoughts
We have discussed the process of adjusting a scope. In short, there are five elements to consider when you want to modify the riflescope. Please remember to take care of all five components.
Besides, the eyepiece focus and brightness control are also important. Without them, the riflescope cannot optimize the performance.
Thank you for reading, and we hope that this post is helpful for you! Enjoy shooting, but be careful not to hurt yourself, gal!
I am Jerry Gonzalez, and my heart beats for the great outdoors, especially in the breathtaking landscapes of Helena, Montana. Engaging with fellow enthusiasts online and at local hunting clubs has been a rewarding experience, and I find great joy in sharing knowledge and experiences with like-minded individuals. My goal is to empower my fellow hunters with well-informed choices, regardless of their experience level.